Wednesday, May 23, 2012

Tire shoes

Zoom in to check out the stitching on the toe strap

This is not exactly a new design; this type of sandal is probably best known as the choice footwear for the Tarahumara people. I am not planning on running 200 miles in these sandals, but they are comfortable, stay on my feet more securely than other sandals I have worn, and will probably outlast any shoe due to the durability of the tire rubber.

Anyone who has every tried to cut up a tire can tell you that without heavy-duty equipment it is nearly impossible. The combination of vulcanized rubber and steel wire is what makes tires so damn durable. However, the steel belts do not go throughout the en(tire). The sidewalls of the particular tire I chose to use were only reinforced with nylon thread, easily cut with a utility knife. There is also a steel reinforced inner rim, which is what provides the stiffness that prevents the tires from popping off your car rims (that would be bad).

 Welcome to my workshop

With a little bit of exploring with the utility knife (I dulled a blade or two in the process), I found the extent of the steel wire and cut out a large, usable section of rubber. This was a larger tire than is found on sedans; probably from a pick-up or SUV. Where do you find tires? Tire shops will give you their discarded tires for free, as they have to pay for their disposal.

I learned to tie this type of sandal from this site. Why re-explain something when someone has done a good job of it already? I went with the easy on/off, slip-on style.

After cutting out the soles to the shape of my foot, I laced it. Since I used 1/2" tubular webbing ($.33/ft) I had to cut some large-ish slits in the sole. I have used 3mm cord in the past; it took a lot of getting used to and was never totally comfortable. This webbing was much better.

Instead of tying a knot for the toe strap like is done on the instructional page, I cut a recessed slot so I could thread a loop of the webbing, then sewed it with a device I have modified: a Speedy Stitcher. The standard model comes equipped with thick, waxed thread and a needle to match. I thought this was pretty lame so I traded out the needle for a sewing machine needle with a round shank and added polyester sail thread. The result is a sleek tool that makes it very easy to sew fast, VERY strong stitches.

It is important to note that I only did one line of stitching down the middle. I tried doing two parallel lines at first, but this made the webbing between my toes too stiff, forcing them apart. Not comfortable. I also reinforced the toe strap under the sole with some adhesive. Despite it being recessed so it contacts the ground much less, I figured a little bit of extra abrasion resistance would not go amiss.

Ta da! 

If you have any questions or suggestions, post to the comments.

Wednesday, February 15, 2012

I'm, like, famous

My apologies for the long break from posting! I have been hopping all over the West, living out of my car. Living the Dream, as they say.

I recently had the pleasure of meeting and climbing with Brad Jackson, who is best known for his 5.13 offwidth first ascents, notably Bellyful of Bad Berries and the finish on Trench Warfare. Pretty crazy. I had been working on getting the first ascent of Throbbing Gristle, a wide crack in Joshua Tree that was toproped for a first ascent in 1983. They didn't have protection big enough to lead these monsters, so they were often satisfied with calling a TR ascent good. We no longer have that luxury and so I decided it would be interesting to get the first lead of it. I had heard some very strong climbers had tried and had been unsuccessful. If only I knew the journey I would be embarking on...

The route is very short, maybe only 30 or 35 feet, but because the wall it is on overhangs slightly and the crack leans, it combines to a total of 25 or so degrees of overhang. The rock is wonderful by Jtree standards; the clean 7-8 inch gash holds very little in the way of crumbly flakes so common in the larger (and less trafficked) cracks here. Placing gear is relatively easy but carrying enough to protect it well is difficult, as only #6 Camalots will fit; only taking 3 pieces, I ended up taking some of the scarier falls I've taken. The movement is also some of the most strenuous I've ever done: "straightforward" armbarring and full-value groveling that probably clocks in at 5.12+ or maybe even 5.13- on lead.

One evening in the campground, I was walking about right at dusk when I happened upon a large group of people. A voice came out of the crowd, someone I knew, saying "Hey, that's him! That's the guy!" A man approached me, the red hood of his puffy down jacket only partially obscuring angular features and intense, unblinking eyes. He stretched out a hand still sporting tape gloves from the days climbing simultaneously asking, "Are you Dave?" I soon learned that it was Brad Jackson; he had heard rumors of someone attempting to lead Throbbing Gristle and wanted to go check it out. (More on Throbbing Gristle if you click through the article link below)

Through Brad I met Chris Van Leuven, author and co-author of several guidebooks for Yosemite Valley. Chris mentioned interest in writing an article about me, which was surprising. He called me a few days later and here is the result:

Flying Upside Down with David Aguasca

And then, I left Joshua Tree, adding myself to the list of people bouted by Throbbing Gristle. As far as I know it stands unclimbed, waiting for an (un)lucky soul.

Locked in on Kamakaze (5.10+), in Joshua Tree

More posts and pictures to be coming soon!

Thursday, August 4, 2011

Climbing for 2011: Score is 1-4

Yes, 1-4, meaning 1 successful summit and 4 bails on long routes in Yosemite Valley. Let's examine a photo record:

#1:

Shern cleaning pitch 3 of the Nose (5.9 C2, 31 pitches) on El Capitan

We bailed after 6 pitches: heinous hauling (for me) and too much exposure (for Shern) shut us down.

#2:

Tarek jury-rigging kneepads for our attempt on Lost Arrow Chimney (5.10, 10 pitches)

We got up one pitch by 8:30am and then the sun blasted us...we now call the Upper Falls wall the Diabolical Parabolical.


#3:

Deep-space Explorer: Ben rappelling off the West Face route (5.7 C2+, 11 pitches) on the Leaning Tower

With a 3:00AM start time, we were planning on topping out in the afternoon. Pitch 3 had other plans for me when an offset cam I had just weighted popped out and sent me for a 25-footer. I lost my aider and the cam into the great beyond...and I only had one other aider. Bye bye.

#4:

Kristin cruising up the splitter hands on the Enduro Corner (pitch 4) on Astroman (5.11c, 12 pitches)

We had done these crux pitches previously on a test run (we had intended on rappelling after doing them) and had felt pretty good; this time around we got an early start (read: poor sleep) but yet again the great Helios had other plans for us as he rode his chariot across the sky. By pitch 6 we were tired (Kristin) and crampy (me). Bail number 4...

The only success so far was on Steck-Salathe (5.10-, 15 pitches) on the Sentinel. Unfortunately, I forgot to bring my camera!

As a consolation prize, here is my redpoint of a recent project, Space Invaders (5.12):


Update: Make that 3(ish) successful summits! I climbed the Rostrum 3 times this season, twice by the popular North Face route and once by a route called Blind Faith, which is just right of the NF.

Sunday, April 24, 2011

Help save the rainforest!

Who would have thought? I guess it's not much of a surprise that I gravitate to jobs like these.

I am living in Oakland, California and working for Caura Futures, manufacturing gear that will allow people in the tropical rain forest to harvest palm fruit without resorting to cutting down the palms.

The shop.

Tarek Milleron, founder of Caura Futures, filming the new video to demo the gear.

Currently, Caura Futures is running a fund-raiser on IndieGoGo, a site designed to help projects such as this one get off the ground. There are a variety of cool incentives for which to donate, such as 12oz of Fair Trade coffee ($25 donation) or even a set of the palm climbing gear ($150 donation).

Go check it out, donate whatever you can, tell your friends and family, and know that with your help we can help save the rain forest.

Post script: I have been hired by Yosemite National Park and will be working as an EMT in Yosemite Valley this summer. Keep your eyes peeled for some great climbing adventures and tons of photos!

Sunday, February 6, 2011

Wilderness Emergency Medical Technician...and more!

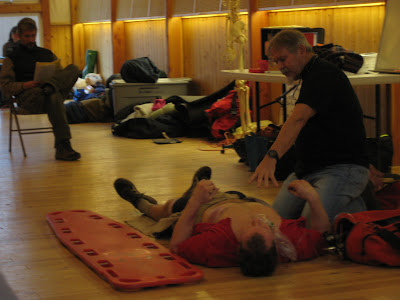
If you're wondering why I haven't updated in a couple months (yeah, I know you were counting the days) it's because I've been immersed in a WEMT course just outside of Yosemite, California. Pretty full-on: 50+ hours in class, studying, or doing clinical rotations.

That's me assembling an O2 tank and regulator, blindfolded.


An improvised long-bone fracture splint.


One of the many days in class.


I COMMAND THEE TO GET BETTER!
Our instructor Daniel demonstrating the Trauma Patient Assessment.


The improvised litter.
Ryan gets to be toted around like a piece of luggage.


Rob inspecting the checklist while being double-traction splinted.


The class left me feeling more prepared, medically, than I have from other courses in the past; now, with the right equipment, I have the know-how to effectively stabilize serious medical and trauma patients.

Some other things I learned in the month since the course ended:

First skiing experience ever:
Cross-country for the day in Yosemite


Figured out how to lay a tile floor with my friend Jesse.

OK, that's all for now. I will have some updates soon on making your own energy bars and also an attempt at making noise-cancelling headphones. Keep your eye-balls peeled!


El Portal, California.
New snow at 5,500' while I split wood in a t-shirt at 2,000'.

Thursday, December 9, 2010

Beef Jerky

Yes, yes, it's that time...random project season! I mean, now that I am back in New York and it's getting cold, the adventures significantly drop off, but I have some things to keep me occupied and relatively sane.

My friend Abe pointed me towards this episode of Alton Brown's Good Eats where he makes beef jerky...with no heat and no dehydrator! I was extremely interested. I recommend watching the two videos before you continue reading: One Two

I followed Brown's recipe and video as closely as possible, with two exceptions:

1. I didn't add onion powder or liquid smoke (too much work) to my marinade.
2. I put all 2lbs of my marinated flank steak in just one (1) air filter and then capped it with an empty air filter

The set-up (new fan in place, note the distance between fan and filter)


Things I learned from my first batch:

-Putting stuff right up against a fan breaks it. Don't do this. I'm not sure why Brown didn't mention this in the video, he may have just had the freakish luck of not running into this problem.
-The pleated air filters that Brown recommends restrict the flow of air significantly. This batch took 24 hours to dry, on a mixture of low/medium fan settings, mostly on medium.

I was convinced that there was a Better Way. That's probably because there almost ALWAYS is. I decided to create a low-cost alternative that would allow the meat to dry faster, hold more meat, and also be re-usable (by virtue of being washable). Enter...


THE MARK II DEHYDRATOR


What is that thing? Very simple, comrades-in-construction:

-A cardboard box. Mine measures 18"x18"x16.5" and was acquired for free from a friend's garage.
-Wooden dowels. I got the thinnest, least expensive ones I could find. I believe I paid $.55 for each one.
-Materials to build screen windows. This is a simple skill that I had to learn because we kept on walking through our sliding screen door and I figured I could repair it. We no longer have this problem because of some high-tech adhesive butterfly technology.
-High flow furnace filters (the green thing in the picture) that fits over one of the openings on your box. I think this does significant work in keeping the jerky dust free until it is dried.
-All these materials can be purchased at a home depot or found for free if you are clever.

Assembly:
1. I made screen window "trays" that fit in the box. To err on the side of caution, I factored in about 1/2" clearance (total) for the width.
2. I cut two of the flaps off each end of the box. They should be flaps that are opposite to each other. The other two remain in place and will act as outriggers to keep the box open during operation.

The inside of the box; one tray in place

3. After cutting holes ever 1.5" (space between trays) I poked the dowels through the box to act as cross-rails for the trays to rest on.
4. To operate the dehydrator, put a strip of duct tape between the fore and aft flaps; this keeps them from folding and allowing the box to collapse.
5. Place the filter in front of the box, position your fan, and turn it on!


Things I learned from this batch:

-After slicing the steak into strips, make sure it's totally thawed before you begin marinating. Frozen flank steak doesn't seem to absorb marinade very well.
-Watch out for overdrying. This batch (~5lbs) took 9 hours to dry on a high fan setting. Once it was dry, it kept on drying out. This may also have to do with the storage method. I was a bit paranoid about the jerky developing mold, so I stored it in the open. A semi-sealed (NOT a ziplock bag) may be the answer.
-I think I also stretched the capacity of the marinade ratio. Stay as close to 2lbs of steak for the amounts given.

If you try this, let me know of any improvements.

Monday, November 8, 2010

David does... the Lost Arrow Spire Direct!

Well, sort of. I had been looking at this beautiful formation for weeks now-after all, it was in my back yard. It was the end of September, and I had not climbed a bigwall yet this season. The only logical course of action was to hike a heinously large load of gear, food, and water (I think my haulbag weighed 70 lbs) up 1,500 feet of sharp talus and loose sand to the base of a route I was going to climb alone in three days. The route: Lost Arrow Spire Direct, 5.9 C2 V.

It all started reasonably well. My friend and housemate Tommy Rokita helped me hike a couple loads up the night before and also belayed me on the first three pitches of this 15 pitch route. It was Tommy's first time jugging (ascending a rope with mechanical rope clamps) and he was cruising.


Tommy jugging...like a boss.

At the top of pitch 3, Tommy rappelled to the ground and I was on my way. This was my first time hauling a bag on a wall. Dealing with that was enough distraction that I forgot to take more pictures on that day.

My one and only solo night on the wall was anything but uneventful. The first event was the howling wind that nearly turned me into a human kite, the second being a medium-sized rodent that found my sleeping form interesting and was hell-bent on collecting nest material from midnight til dawn. Little sleep was had by me.

The next morning on my spacious stone perch was beautiful, despite the lack of sleep.


Looking down at the base of the (now dry) Upper Yosemite Falls. Can you spot the people?


The view from the top of pitch 5. You can see my haulbag just to skiers left of the large ledge.

My first pitch of the day (#5 of the route) went pretty terribly. The information from the guidebook was incorrect and then once I figured out what was wrong, the rest of the pitch went very slowly. The previous day I had take 50 minutes to lead pitch 4; pitch 5 lasted 3 hours. After a little calculation and deliberation, I decided to retreat.


The guidebook suggested I pendulum off this. No thanks.

Bailing went surprisingly smoothly, until I arrived at the ground. Hiking down with my full haulbag turned out to be horrendous. And then it started raining. Remembering that part of the descent was a steep unprotected slab, I stashed the haulbag in the bushes and took off down the scree with my two ropes. I fixed them on the slabs, scurried down, and ran into Tommy coming up the trail.

The next day I went and retrieved the haulbag.


How can someone bailing look this happy?

Next week, I returned with my friend and housemate Eric Bissell to do some reconnaissance of the upper pitches of the route. This time we had much more success.


Eric scoping pitch 9.


A little bit of rain and the falls start trickling again.


Sometimes all you need is food, cool rocks, and good company.


A privileged view: Rare cloudcover in the Valley.


Playing peekaboo with Half Dome.


Here we are on our first day, enjoying a break in the clouds:


All in all, a few good days of fun.


Chicken wing! Generator Crack, (5.10c).